Nexus搭建Maven私服
一、环境准备
- ubantu操作系统,版本22.04
- 需要先安装 java 环境,这里以安装 java17 为例
- 在官网安装 nexus 安装包
java17下载地址:https://www.oracle.com/java/technologies/javase/jdk17-archive-downloads.html
java17安装包:https://download.oracle.com/java/17/archive/jdk-17.0.12_linux-x64_bin.deb
nexus下载地址:https://help.sonatype.com/en/orientdb-downloads.html
二、Java17安装
将下载好的 java17 deb包通过 SSH 连接终端工具上传到 /home/java17 目录下,如下:

通过以下命令进行安装
sudo dpkg -i jdk-17.0.12_linux-x64_bin.deb安装完成之后,可以通过 java -version 进行检查是否安装成功
三、安装Nexus
将下载好的 nexus 安装包通过终端工具上传到 /home/nexus 目录下,然后将安装包进行解压操作
sudo tar -zxvf nexus-3.74.0-05-unix.tar.gz解压完成之后完成之后多出 nexus-3.74.0-05 和 sonatype-work 两个目录

cd nexus-3.74.0-05/bin
./nexus start # 运行nexus
./nexus stop # 停止nexus默认开放的端口为 8081,默认账户为 admin , 默认密码在 /home/nexus/sonatype-work/nexus3/admin.password 文件中。使用默认账户登录成功,会要求立即修改密码
cat /home/nexus/sonatype-work/nexus3/admin.password # 查看默认密码四、配置Nexus开机自启
cd /etc/systemd/system
sudo touch nexus.service # 创建nexus.service
sudo chmod 777 nexus.service # 添加执行权限编辑 nexus.service
# nexus.service 配置
[Unit]
Description=nexus service
After=network.target

[Service]
Type=forking
ExecStart=/home/nexus/nexus-3.74.0-05/bin/nexus start
ExecStop=/home/nexus/nexus-3.74.0-05/bin/nexus stop
Restart=on-abort

[Install]
WantedBy=multi-user.target重新加载 systemd 配置
sudo systemctl daemon-reload设置 nexus 的开机启动
sudo systemctl enable nexus五、Nexus配置私有仓库
5.1、Nexus 仓库概念
nexus 默认已建好4个库,简单解析下各个库的作用
maven-central 默认配好的中央仓库,指向 https://repo1.maven.org/maven2/
maven-releases 一般用于自己存放自己开发项目的稳定版本,默认不能重复发布,即deploy,可以设置为允许重复 deploy
maven-snapshots 一般用于存放自己开发项目的快照版本,默认允许重复发布
maven-public 组合库,一般是组合以上三种库,通常在项目中配置这个仓库group:仓库聚合,默认是 releases > snapshots > central,可以在仓库管理界面引入其他配置的库,并设置顺序
hosted:私有仓库,存放自己开发的jar
snapshots:本地项目的快照仓库
releases: 本地项目发布的正式版本
proxy:代理类型,可以配置aliyun的仓库
central:中央仓库5.2、修改 maven 服务下的setting.xml
建议将 setting.xml 复制一份命名为 setting-local.xml
<?xml version="1.0" encoding="UTF-8"?>
<settings xmlns="http://maven.apache.org/SETTINGS/1.2.0"
          xmlns:xsi="http://www.w3.org/2001/XMLSchema-instance"
          xsi:schemaLocation="http://maven.apache.org/SETTINGS/1.2.0 https://maven.apache.org/xsd/settings-1.2.0.xsd">

<!-- localRepository 建议构建一个新的目录,本地存在的jar包不会通过nexus进行下载了 -->
  <localRepository>
    E:\maven\maven-local-nexus
  </localRepository>
  <pluginGroups></pluginGroups>
  <proxies></proxies>
  <servers></servers>
  <!-- 配置 nexus 作为 jar 包下载地址,本地没有就会去代理的远程仓库进行下载 -->
  <mirrors>
    <mirror>
      <id>maven-public</id>
      <mirrorOf>central</mirrorOf>
      <name>Nexus Repo</name>
      <url>http://192.168.1.215:8081/repository/maven-public/</url>
    </mirror>
  </mirrors>
  <profiles></profiles>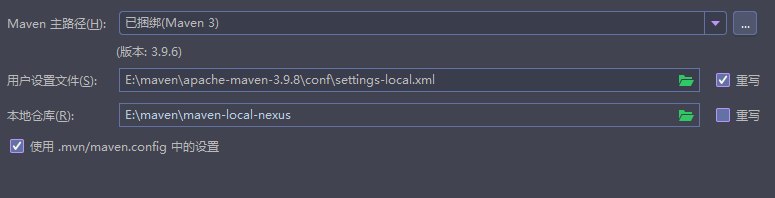
</settings>使用 idea 编辑器创建 maven 项目,并配置 maven 设置
因为我在前面禁用了匿名访问,所以需要继续配置 setting-local.xml。如果允许了匿名访问,就无需以下配置
<server>
  <id>maven-public</id>
  <username>admin</username>
  <password>caigh123</password>
</server>🔔注意:server 标签内的 id 标签值必须和 mirror 标签中的 id 值一样。
以上就可以通过本地 nexus 私服仓库下载 jar 包了
5.3、将 jar 包上传到 Nexus
在 maven 项目工程的 pom.xml 添加以下配置
<!-- deploy 上传jar包  -->
<distributionManagement>
  <repository>
    <id>maven-public</id>
    <name>Nexus Release</name>
    <url>http://192.168.1.215:8081/repository/maven-releases/</url>
  </repository>
  <snapshotRepository>
			<id>maven-public</id>
			<name>Nexus Snapshots</name>
			<url>http://192.168.1.215:8081/repository/maven-snapshots/</url>
		</snapshotRepository>
</distributionManagement>🔔注意:repository 标签内的 id 标签值必须和 maven的 setting-local.xml 配置的 server 标签中的 id 值一样。
上传jar通常上传到 maven-releases,maven-snapshots 仓库中,主要与 maven-public 从远程下载下来的 jar 包进行区分开。
然后执行 mvn deploy 即可发布成功